This post explains how to get http://
www.yourblogname.com/ to work for your blog when you're using
Blogger and want to use your own www domain name for your blog (instead of http://yourblogname.blogspot.com), and not just the "naked" http://yourblogname.com. I know lots of people have had problems with the www part, so I explain the fix.
It includes a step by step on how to change over smoothly to a www custom domain on Blogger, with screen shots for popular domain registrar
GoDaddy and your Blogger dashboard.
Background
For bloggers on
Google's free
Blogger blogging platform, for over a year now since the introduction of the
now feature complete fancy New Blogger,
formerly known as
Blogger Beta, with
its widgety goodness and
enhanced developer-
friendliness, you've been able to blog via Blogger's service and enjoy free webspace on
Blogspot.com, but use your
own domain name for your blog instead of http://YOURNAME.blogspot.com/.
For example this blog's main URL is now
http://www.consumingexperience.com but it used to be
http://consumingexperience.blogspot.com (and that web address or URL still works to get you here, and my blog's files are still stored behind the scenes on Blogspot.com).
This
custom domain service is excellent, and for
SEO reasons I
very strongly advise using it as soon as you can after you start your blog (ideally from its inception), because then:
- you can build up search engine cred under your own domain name, rather than under "whatever.blogspot.com"
- you won't suffer so much the pain of the sudden big drop in search engine rankings if you've built up decent Google juice under blogspot.com, then switch to a custom domain, and
- you won't suffer so much through the effort and time and worry that it will take to build up search engine cred all over again under your custom domain name.
I've blogged the
benefits and reasons for using your own domain name ASAP, previously - after I suffered myself through a drop in this blog's
PageRank and its placing in Google's search results, when I switched this blog's domain from consumingexperience.blogspot.com to www.consumingexperience.com. I'd say it took at least 6 months for my visitor numbers to get back to roughly where they were, though luckily in fact during the last couple of months they're starting to better the old figures. But basically, I've lost 6 months of increasing my rankings. And I'd mention that my AdSense earnings, though they're not anything I can live on, dropped significantly too during those 6 months.
I think using a custom domain is easier than
FTP publishing, where you use webspace on your own server (or space you rent from a hosting provider) to host your blog's files instead of Blogspot. (See
Blogger Buzz for
some advantages of custom domains over FTP).
There are decent
Blogger help pages on custom domains. However people had trouble getting the "www" URL to work to take people to their blogs after switching to a custom domain on Blogger. I thought the teething problems had been ironed out by now, to mix a metaphor, but I recently had a
comment that suggested otherwise.
So, here's how to switch to a custom domain on Blogger that starts with
www (e.g. "www.yourblogname.com").
How to get a www URL for custom domain to work on Blogger
The main thing to note is that technically "yourblogname.com" is
separate and different from "www.yourblogname.com".
Blogger will only let you use
one of them. Most people are used to the "www" URL, so it's best to use that, and then redirect the "sans www" version (yourblogname.com), the "naked domain", to the www version.
There are two main things you have to do - set things up on the domain name end (your domain registrar), and then set things up on the Blogger dashboard end.
To do that, the steps to take are these,
in this order (to avoid downtime on your blog) - assuming you've already bought your own domain name from a provider:
- Go to your domain name provider's site (not Blogger) - i.e. your domain name registrar or domain name hosting service, from whom you bought your domain name.
- Login to your account, and set things up so that the www version of the domain name you bought points to ghs.google.com (geek speak: on your domain name provider's DNS server create a CNAME record for www.yourblogname.com, and associate the www "alias" or hostname with ghs.google.com as the value or destination - see also Google's helpful guide on the domain name system).
- Now Blogger has a help page with step by step instructions on how to create CNAME records if your domain name provider is a common one like:
- GoDaddy.com
- ix web hosting
- 1and1
- EveryDNS.net
- Yahoo!SmallBusiness
- No-IP; or
- DNS Park;
- and even generic instructions for Other hosting services
- The most important point to note is that you must create the CNAME record for the www "alias", not for the "naked" domain.
- Blogger do provide helpful a step by step (see the links in 3 above), but I always find screenshots more helpful, so here are the steps for my own registrar GoDaddy, pictorially - if you use another registrar hopefully they'll still be of help. The things to click are outlined in red, and obviously you should select your own domain, the one you want for use on Blogger:

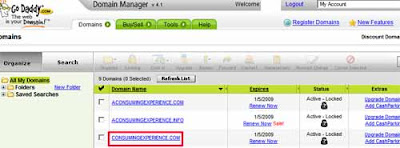
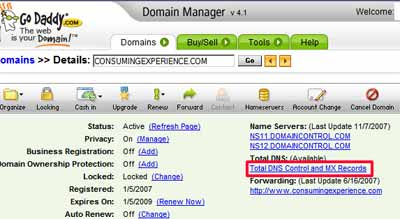
If you've already got a CNAME record for "www" then click to edit it (see the bit outlined in blue below), otherwise click to create a new record (outlined in red).
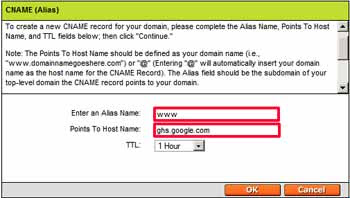
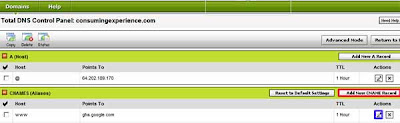 Now the next bit is the trickiest bit for non-techies to get, in my view. Note that for the alias box you enter just "www". NOT "www.yourblogname.com", not blank, just "www" (don't worry about the TTL line, no need to change that). Then OK or Save everything:
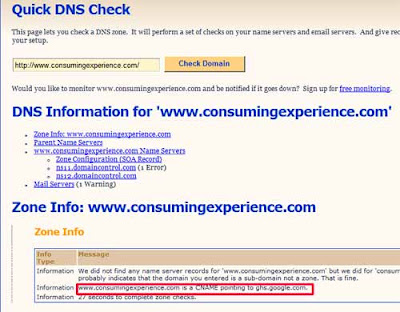
- It'll take a few hours, maybe a day or so, for this to "take". So give it a day or so, then check that "www.yourblogname.com" really does point to ghs.google.com. To do this, you can do a nameserver check using services like Pingability.com (which is free) - in the box enter "www.yourblogname.com" (obviously changing it to your own real domain name, with the www), click Check Domain, wait a bit, and the results should say that your www points to ghs.google.com:
 Don't worry that if you try www.yourblogname.com and you get a 404 error. That's because you've not quite finished yet. But it's best to test that the switch to Google on the domain name end has worked, before you go to the next step.
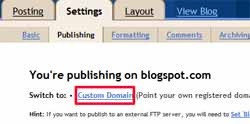
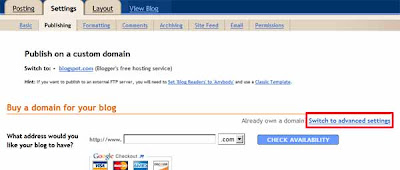
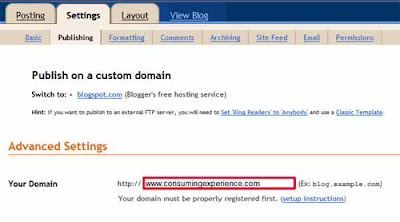
- Now you're ready to switch things over on the Blogger side. This Blogger help page shows you how (see the "Blogger Settings" section there) but here are screenshots again. The important thing here to note is that you should enter the "www" part also when you give Blogger your domain name, and of course Save your settings:
(Google Apps aside. Blogger now provide the option to buy your domain through them. If you do that, I suspect that the "www" should be easier to set up than before, but I've not tried that option so I can't say for sure. That's because you'll get a "Google Apps for your domain" account with it, and in the past people have had problems if they had their domain on Apps then wanted to use the same domain as a custom domain on Blogger because Apps took over the "www" name so if you tried to use it for your blog you'd get a "Blog already hosted at this address" error message. If you already have GAFYD and had that problem, you had to delete that service from Apps in order to use www on Blogger. Or if you had set up the www on Blogger, then tried to use that Google Apps for that domain, Apps would take over the "www" subdomain. But I'm not sure if it still does. Effectively you couldn't have a domain hosted on Apps and use the www for that domain on Blogger at the same time. If anyone knows whether when you buy a domain name via Google from the Blogger dashboard page you can use www for your domain even though you get Apps, or indeed what the situation now is with Apps vs. Blogspot and the www issue generally, please let me know!)
- And that should be it! Test the "www" address in your browser and hopefully it should now go to your blog and show your shiny new domain name.
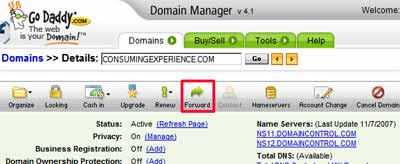
How to forward your naked domain to your new custom domain
It would also be sensible to make sure that your bare domain, e.g. yourblogname.com, will forward to your new custom domain hosted on Blogger / Blogspot. Again, you do that through your domain registrar, after logging in, via their domain forwarding option.
Here are screenshots showing how it's done with Godaddy, after you've selected the domain to amend:
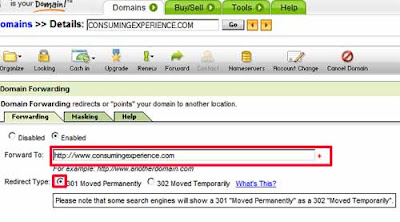
Make sure you fill in the "Forward to" box with your "www" domain URL, and that "301" is selected rather than "302", then OK and save etc:
(With thanks as always to my Magical Sheep pardner
Kirk, without whom I'm sure the www would have gone wrong for me too!)
Tags:
domain name, ddomain name change, changing domain names, Blogger custom domains, Blogger custom domain, custom domains, Google Apps, Google Apps for your domain, GAFYD, search engine optimisation, SEO, Improbulus, A Consuming ExperienceLabels: Blogger, domain names, domains, Google


 One trap to watch for - if you're using the Keep Current Time script, you may be forgiven for thinking that "Blogger time" is the same as your time, because the script always makes the Blogger post editor show, at the end of your post, your local time. But that's not necessarily the case. When you untick the Keep current time box, and manually change the time and date (to say 10 am 10 May 2008) and hit Publish, Blogger will publish your post at the date and time you've set - but only at the moment which is that exact time in the timezone shown in your Settings, Formatting tab. If that timezone is set to a different one from your own (it defaults to US Pacific time), then it will only publish the post when it gets to 10 am on 10 May 2008 in California - not 10 am 10 May in London!
 So here's a tip: if you're using Keep Current Time and want to use scheduled posting, hie ye over forthwith to Settings, Formatting and ensure your Formatting timezone is set to your own timezone (saving the change of course), to avoid possible future confusion.


